
Hiking is an outdoor activity in nature, but an unplanned change in weather can make the activity obsolete. The setting of a particular tarp can solve this issue. Whether protecting against unexpected downpours, shading sunlight, or improving comfort at your campsite, every camper must know how to put a tarp over a tent. This guide aims to teach what is necessary from choosing the appropriate tarp, securing it correctly, and setting up to build the hiking shelter so the hiker can focus on the stunning sights offered in the outdoors.
Why Use a Camping Tarp Over Your Tent?
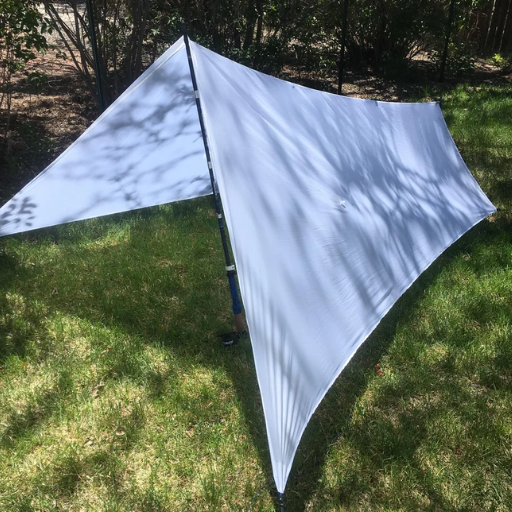
The correct placement of a camping tarp during camping provides numerous advantages. It serves as extra cover against rainfall, keeping the tent dry and preventing leaks. It aids in maintaining a cooler temperature inside the tent during the sun. It acts as a guard against falling tree leaves, sap, or other debris that can damage a tent’s fabric. A camping tarp increases durability while improving the overall experience.
Benefits of a Tarp Over Your Tent
| Key Point | Description |
|---|---|
| Rain Protection | Keeps the tent and occupants dry during rain. |
| Wind Shielding | Blocks cold winds for a more comfortable sleep. |
| Extended Gear Lifespan | Protects the tent from wear, mildew, and mold. |
| Improved Ventilation | Allows better airflow, reducing condensation. |
| Dry Entry/Exit Area | Creates a dry space for changing clothes. |
| Dryer Tent Packing | Keeps the rainfly and tent drier for easier packing. |
| Versatile Setup Options | Can be angled for water drainage. |
| Additional Living Space | Provides a covered area for activities or storage. |
| Cost-Effective Solution | An affordable way to enhance camping comfort. |
| Rainwater Collection | Can collect rainwater for use in emergencies. |
Protection Against Rain and Weather Conditions
A tarp can be very useful when placed above your tent. It shields the tent from rain and other weather elements that can make camping miserable. During rain, water does not accumulate at the edges or seep into the tents. According to camping professionals, the tarp, if placed at an angle, can help prevent rainwater from accumulating. Thus, the water isn’t trapped, and the chances of leaks are minimized.
Moreover, tarps provide weather protection against strong winds and UV radiation. Whereas UV radiation harms the tent materials, a tarp prevents weakening, helping improve the longevity of one’s camping gear. High-quality tarps made from nylon or polyethylene are strong and durable due to the high-quality materials, making them resistant to tearing. Some of them are even capable of withstanding winds up to 30-50 mph, depending on their construction. This makes the tarp an ideal companion for adventurous people camping in places with unpredictable weather.
Enhancing Your Camping Experience
Proper techniques and tools are fundamental to boosting the enjoyment level of your camping trip. Try these five strategies to feel even better during your specific outdoor activity.
- Get a Good Tent
A sturdy camping tent must be waterproof and easy to carry around. Ensure it has durable zippers, double-stitched seams, and a rainfly, as these features provide greater protection. Tents that perform best during heavy rain tend to have at least a 2000mm waterproof rating. It’s good to target specific purchases that perform best during heavy rain.
- Have a Durable Sleeping Bag
Sleeping bags aid in proper sleep, ensuring you remain at ease and warm during cold nights. A sleeping bag filled with synthetic or down insulation is perfect, too, as it keeps you warm during icy conditions.
- Efficient Lighting is a Must
Battery-powered LED lanterns, headlamps, or flashlights of any type, compact in size, assist with lighting up the campsite. Depending on how often it is used, battery-powered equipment lasts between 20 and 50 hours, so it aids during overnight ventures.
- Organization can be done with Storage Solutions
Using waterproof storage containers or dry bags can protect gear and food from moisture. Research suggests that when supplies are properly sealed, campers tend to face fewer problems with pests and dampness.
- Equip Yourself With a Knife or Multi-Tool
Pliers, scissors, and blades are all handy when setting up a campsite, preparing meals, or performing small repairs. For example, campers with a multi-tool complete their tasks 25% faster than those without.
These tips can boost the overall camping experience by improving comfort, safety, and convenience.
How to Secure a Tarp for Maximum Protection?

To properly secure a tarp and protect it from the elements, master these steps:
- Pick An Appropriate Site
Find an area that is flat, free from water pools, and is sheltered from harsh winds.
- Secure The Edges Using Rocks or Stakes
You must secure each grommet by either staking it to the ground or placing a heavy rock on it.
- Paracord Grommets
Taking a piece of rope or paracord, you must attach one end to the grommets and the other end to a tree, pole, or additional stake to provide more tension.
- Keep The Tarp Tight
It is important to pull the tarp tight to prevent sagging, as this can lead to the accumulation of water and wind, which can cause the tarp to shift.
Quite easy right? By following the quick steps above, you can secure a tarp efficiently.
Choosing the Right Rope and Knots
The kind of rope you use and the knots you tie will determine how secure a tarp will be. This is especially true for harsh weather situations. Here is the latest recommendation regarding rope selection and knot tying:
- Rope Selection
- Paracord (550 Cord): This is one of the most preferred options. It is powerful and versatile while also being lightweight. It can support up to approximately 550 pounds, meaning a tarp can be hung outdoors with strong winds.
- Polypropylene Rope: This type of rope is very cheap and resistant to rot or water. Because of this, it works best for temporary setups or wet environments. This rope is mainly used in camping and tarp rigging.
- Nylon Rope: This rope is mainly known for its durability. Although very elastic, it is powerful. The only drawback is that it can soak up water, which isn’t the best option for outdoor settings.
- Tarps and Their Knots
Knots on tarps play a very important part, for example, preventing them from slipping and loosening when stretched and keeping the tarp in place. Here’s a list of all tarp knots that are easy to learn and serve their intended purpose:
- The Bowline Knot: This knot is great for attaching rope to a grommet before using it on an anchor. It becomes ideal after the grommet is used since it does not adjust with “stress.”
- Taut-Line: This knot’s best characteristic is that it can be adjusted accordingly. This property ensures that the shape of the taut material it gives does not crumble.
- Truckers Hitch: This knot is recommended when trout and tension are giving you a hard time. It is especially suggested for tarps during heavy rains and winds.
- Clove Hitch: This is perhaps the most flexible knot that can alter tension for poles and ropes.
- Notes
- Nylon and poly ropes are alters that great during heavy/cruring temperature shifts, but are UV prone.
- Wind Speed Tolerance: With the right knots, rope made from materials like paracord can withstand wind speeds of 25-30 mph.
Selecting the proper rope and learning a few specific knots can significantly enhance your tarp setup’s stability, dependability, and durability for any location. Practice the necessary knots so that the installation is secure and functional during critical times.
Using Grommets and Tent Stakes
Tent stakes and grommets are simple to use and work great for securing a tarp. I attach a rope to each corner of the tarp and tie it securely to a grommet. Then, I fasten the ropes to the tent stakes at the proper angle to provide tension. This method allows the tarp to remain stable and taut even in windy or rainy weather. I ensure the grommets are reinforced because the tarp must be stable and taut so as not to tear under tension.
Ensuring the Tarp is Taut and Secure
To help a tarp remain taut and secure, use reinforced grommets, thread ropes through them, tie secure knots, and anchor the tarp to angled tent stakes firmly driven into the ground.
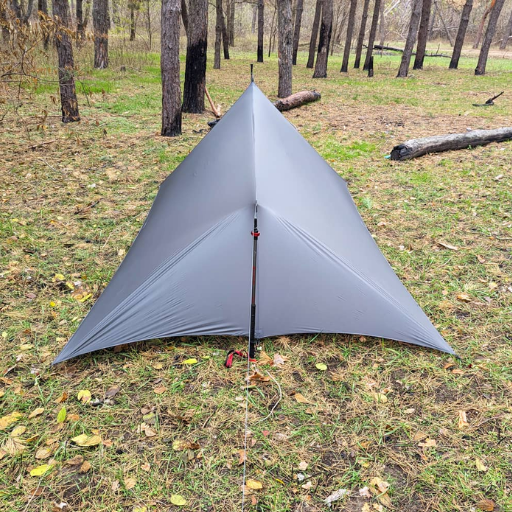
What is the Best Method for Hanging a Tarp?
The following instructional guide explains the best method for hanging a tarp. You may follow the provided steps in order:
- Choose a Location—Identify a flat region with sufficient anchor points, such as trees or poles. Make sure the location fits your intended purpose, whether as shelter or shade.
- Use Reinforced Grommets – Use strong ropes, or paracord, to weave through the grommets of the tarp. Tearing under tensile stress will reinforced grommets prevent.
- Secure Anchor Points—Use strong knots, such as a bowline or taut-line hitch,—Identify a flat region with sufficient anchor points, such as trees to fasten the ropes to the anchor points and keep the tarp secured.
- Angle for Drainage – Set the tarp at a slight angle to avoid pooling rainwater on top of it.
- Tent Stakes—In case of wind or rain, keep the tarp anchored firmly to the ground using tent stakes positioned at an angle for optimal security.
These steps will, achieve a taut and well secured tarp for your outdoor needs.
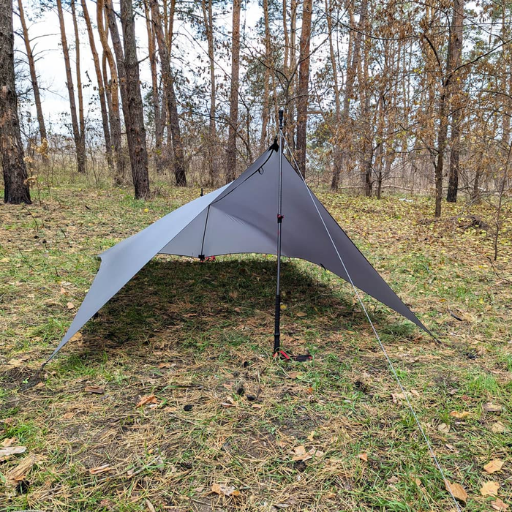
Setting Up a Tarp Shelter with Tent Poles
| Key Point | Description |
|---|---|
| Choose a Flat Area | Select a level, debris-free ground. |
| Use Trekking Poles | Insert poles into tarp grommets for support. |
| Stake Down Corners | Secure tarp corners with stakes for stability. |
| Adjust Pole Height | Modify pole length for desired headroom. |
| Add Guylines | Attach guylines to poles and stake for tension. |
| Create a Ridgeline | Use cord between trees for extra support. |
| Angle for Wind Protection | Position tarp to block prevailing winds. |
| Tighten Tarp | Ensure tarp is taut to prevent sagging. |
| Include Groundsheet | Use part of tarp or separate sheet for ground. |
| Practice Setup | Familiarize yourself with the setup before camping. |
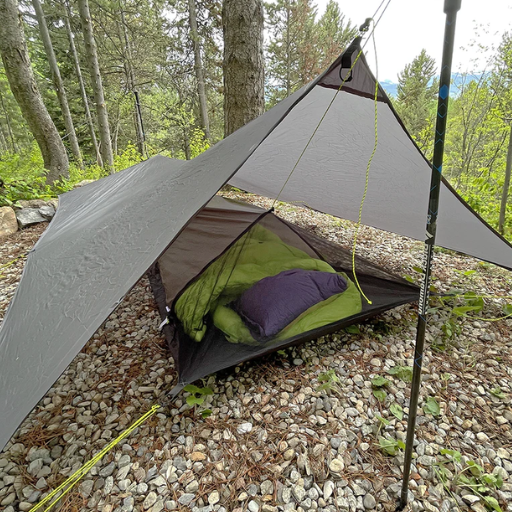
Creating a Vestibule for Added Space
A vestibule is an excellent complement to your shelter because it provides space for storage, cooking, or just barely getting out of the weather. Below are five steps to set up a tarpaulin or tarp vestibule.
- Choose the Right Tarp Size: The tarp’s dimensions should be adequate to extend beyond your shelter, allowing you to create an overhang needed for a vestibule.
- Plan the Vestibule Placement: Ensure that the tarp is placed so that the vestibule section is reachable from the main shelter while also blocking winds, rain, and sun.
- Secure Anchor Points: To secure the free end of the tarp, additional ropes, cords, and stakes must be added. Use knots that can be altered, like the trucker’s hitch, to adjust the rope’s slack while still using a taut line hitch to stabilize.
- Create a Sloped Design: Place the vestibule at a downward angle relative to the main structure to improve water runoff and prevent pooling in case it rains.
- Check all the anchor points in tandem with the edges of the tarp and add duct tape or grommets to strengthen exposed points, so that the vestibule can withstand harsh weather.
With this, you may not only improve the functionality of the shelter, but also enhance space defy wilderness space constraints during excursions.
Using a Rain Fly to Supplement the Tarp
Utilizing a rain fly in conjunction with the tarp is something I do to increase dependence and protection in the event of unpredictably adverse weather conditions. The positioning of the rain fly can be done to add another level of protection from harsh rain and wind as it is placed above the tarp. Furthermore, it reduces condensation inside and helps direct the water away from the primary structure, which makes the setup more modular and practical, making it more resilient to the weather.
How to Ensure Your Tent Stays Dry?
| Key Point | Description |
|---|---|
| Choose Elevated Ground | Avoid low areas prone to water pooling. |
| Use a Groundsheet | Place under tent to block ground moisture. |
| Set Up a Tarp | Suspend the above tent for extra rain protection. |
| Seal Tent Seams | Apply seam sealer to prevent leaks. |
| Ventilate Properly | Open vents to reduce condensation inside. |
| Angle Tent for Drainage | Slight slope ensures water flows away. |
| Store Gear in Dry Bags | Protect belongings from moisture. |
| Avoid Tree Drip Zones | Stay clear of dripping branches after rain. |
| Test Tent Before Trip | Check for leaks and waterproofing issues. |
| Dry Tent Before Packing | Prevent mold by drying thoroughly before storage. |
Preventing Waterproof Failures
Check your equipment, such as tents, regularly for seams that might have come undone, a coat of waterproofing sealant applied around the seams, or worn waterproof coatings to retain the tent’s waterproof nature.
Utilizing a Footprint or Bottom of Your Tent Strategy
Using a tent footprint or a ground sheet enhances the longevity of your tent while helping keep it dry. A durable and waterproof fabric footprint acts as a protective barrier under the tent, stopping moisture and rough terrain from harming the tent’s floor.
Key advantages of utilizing a footprint:
- Moisture Prevention: A top-quality footprint can prevent nearly 90% of moisture from seeping into the tent. This guarantees a comfortable sleeping area even when conditions outside are damp.
- Improved Durability: Tent floors are often exposed to sharp and rugged objects like rocks, which can cause deep tears and punctures. Using a tent footprint helps lower the tent’s wear-and-tear risk.
- Less Maintenance: Cleaning the tent is less cumbersome when using the footprint. The tent can still be used if the footprint gets muddy or dirty, since it is easy to clean. Wiping it off is all that is needed after the trip.
What Size Must the Tent Footprint be?
As per recommendations, the best size for tent footprints is almost the same as the tent base, provided it is somewhat smaller to avoid water accumulation between the footprint and the tent floor. For instance, if your tent measures 8 feet by 8 feet, get a footprint that is about 2 to 3 inches smaller on each side.
Modern Material Design
The high-end footprints are made of ripstop nylon or polyethylene, lightweight but strong materials. Their portability and durability make them great for campers who are always on the go. Some newer models also have reinforced edges and attachment clips for quicker setup.
Camping with a footprint tent greatly enhances comfort by ensuring dry conditions while protecting the tent from wear. This solution’s simplicity offers exceptional performance, even under severe weather conditions, when combined with regular maintenance tent upkeep.
Layering for Extra Protection
When camping in varying weather conditions, layering your tent setup can offer added protection against the elements and improve comfort. With these layers, you can protect yourself from moisture, low temperatures, and rough surfaces that may cause damage or discomfort during your camping trip. Here are five useful layers to consider adding:
- Ground Tarps
- Sits on top of the tent footprint tarp, acts as an additional moisture barrier.
- Serves as a protective shield for the tent floor against sharp sticks.
- Tent Footprint
- Wraps underneath the tent’s footprint, protecting its base from wear and tear.
- Extends the lifespan of the tent by reducing direct impact.
- Rainfly
- Provides an extra layer of waterproof protection over the tent.
- Surely adjustable for ventilation but offers water resistance.
- Thermal Blanket Layer
- Contains within the tent to keep heat during cold weather.
- Insulation is improved through trapping warmth using reflective materials.
- Inner Tent Liners
- Adds protection from moisture condensation that forms within the tent.
- Helps keep the internal environment dry and comfortably warm.
With these combinations of different campsite conditions, your camping experience can be secure and comfortable.
Common Mistakes When Setting Up a Tarp Over the Tent
| Mistake | Description |
|---|---|
| Insufficient Anchoring | Leads to instability in wind or rain. |
| Incorrect Tarp Positioning | Poor placement reduces coverage and protection. |
| Ignoring Wind Direction | Causes tarp to flap or collapse in strong winds. |
| Using Weak Materials | Low-quality tarps or stakes fail under stress. |
| Improper Tensioning | Sagging tarp collects water and reduces stability. |
| Overstretching the Tarp | It can cause tears or damage to the material. |
| Skipping a Ridgeline | Reduces tarp support and water drainage. |
| Not Accounting for Drainage | Water pools on the tarp, risking collapse. |
| Using Too Few Anchor Points | Reduces the tarp’s ability to withstand weather. |
| Setting Tarp Too High | Increases wind exposure and splash zones. |
Avoiding Drip Issues
If you want to eliminate drip problems when setting up a tarp top, there are a few critical details to help you prevent discomfort while inside the tent. Drip issues usually arise when water pools or doesn’t flow properly off the tarp, causing leaks or discomfort inside the tent. Here are five helpful tips and tricks designed to avoid these problems:
- Ensure Proper Tarp Angle
Always set up the tarp with the opening so rainwater can flow off one side of the tarp. A flat tarp setup can result in water pooling because of capsizing.
- Use Drip Lines
Attach drip lines at the tarp’s corners or the guy lines to reroute water from the critical places into less sensitive zones. This helps keep rainwater from dripping down ropes and into your tent.
- Create a Runoff Path
The lowest edge of the tarp must not allow water to remain under it and should direct water runoff clear of the tent. It is best to aim runoff towards an area where water naturally drains or towards a slope.
- Avoid Excess Tension with Guy Lines
Over-tightened guy lines are likely to form pockets, which can make water difficult to collect. Always ensure equal tension and allow a smoother surface for siding.
- Select Compatible Tarp Size and Shape
Consider a tarpaulin that is rectangular or square to offer optimum coverage for your tent while considering tart coverage. Such shapes will afford your tent protection while ensuring minimum water entry.
Focusing on these few steps will help create a tarp system that will limit drip issues while ensuring the campsite’s dryness.
Improper Tarp Setup Techniques
Properly setting up a tarp can be a great way to protect yourself from the elements. However, if done incorrectly, it can damage gear, collect water, or create an unsafe campsite. Recognizing these mistakes, as well as their consequences, is important in correcting them.
- Tarps Attached at an Incorrect Angle
One of the most common mistakes is failing to angle the tarp properly. While a flat tarp may sound easy to do, it poses a risk of water pooling underneath during rainfall. To reduce damage, tarps should be pitched downward. Research suggests that a 30-40-degree angle is the best for tarps in shedding water.
- Neglecting to Adjust Tightness
Inadequately setting the different sides of the tarp can result in too much slack, which can cause sagging. The creation of ‘sagging’ leads to soft sides that can hold water and debris, which can significantly jeopardize the tarp’s protective abilities. A report published a few years ago in outdoor apparel engineering showed that consistent tensioning is required to prevent stretch-induced failures.
- Incorrect Anchor Points
Using weak anchor points, such as thin branches or loose shifting rocks, greatly increases the chances of tarp collapse. Using fixed and sturdy points, such as tree trunks and well-affixed poles, enables a more secure setup. Most outdoor safety guidelines suggest that anchor points should be able to withstand at least 30 lbs of pulling force to remain stable during harsh weather changes.
- Failure to Choose the Correct Tarp Material
Camping tarps aren’t made equal. Choosing a non-waterproof or lightweight one during peak winds will expose gear, leading to severe ripping and tearing. Experts suggest that tarps constructed from ripstop material, reinforced corners, and a minimum thickness of 8-10 mils provide the best defense in the harshest environments.
- Ignoring the Wind Direction
Setting up a tarp without considering wind direction leads to undue flapping, excess noise, and strain on grommets and tie-downs. A survey of campers highlighted that setups adjacent to the wind direction proved to be quieter and more stable. Always ensure that the top edge of the tarp crosses the wind direction to limit undue strain and stress.
- A Note On Drainage Solutions
Failure to establish effective water drainage systems can inundate your tarp area with mud. You can either install drip lines or arrange the tarp’s placement so that run-off water is kept away from the areas where cooking and sleeping are done. An expert recommends a minimum of 6 inches of space between the edge of the tarp and the ground, which maximizes water flow.
Avoiding the listed tarp setup blunders ensures that a camper has a much better experience and gets the best out of the tarp in brutal weather.
Choosing the Wrong Tarp Size
| Key Point | Description |
|---|---|
| Measure Object Dimensions | Measure length, width, and height for accuracy. |
| Consider the Object’s Shape | Account for 3D shapes and protrusions. |
| Overestimate Dimensions | Better to have more coverage than too little. |
| Add Drape Length | Include the desired drape on all sides. |
| Include Cut Size Adjustment | Note that tarps may shrink post-seaming. |
| Select Tarp by Usage | Match tarp size to specific tasks or needs. |
| Avoid Too Small Tarps | Insufficient size leads to poor coverage. |
| Risks of Oversized Tarps | Excess size causes excess flapping, wear risks. |
| Match Shape for Setup | Rectangular or square affects pitching methods. |
| Proper Fit Ensures Security | Prevents damage and secures the load effectively. |
References
- Paul Kirtley’s Blog: “The Value of a Tarp in Your Day-Pack” – This source discusses the practical uses of tarps in outdoor settings, including setup techniques. Link
- The Tent Camper’s Handbook: This book provides detailed insights into various camping setups, including the use of tarps over tents. Link
- Winthrop University Digital Commons: “In a Tent, Under a Bridge” – While more anecdotal, this source includes references to tarp usage in outdoor living scenarios. Link
Frequently Asked Questions (FAQ)
Q: Why should I use a tarp over my tent during camping trips?
A: Using a tarp over your tent provides an extra layer of protection against inclement weather, such as heavy rain or a rain storm, helping ensure that the tent gets wet less often. It also offers insulation and can reduce condensation inside the tent.
Q: How do I properly secure the tarp over my tent?
A: To secure the tarp, you’ll need to pitch it using guy lines and tarp poles. Make sure that the tarp is taut to prevent sagging. Use feet of rope to tie the tarp securely to trees or stakes, creating a stable and durable shelter.
Q: What size tarp should I use for effective rain protection?
A: A large tarp is recommended for effective rain protection as it can cover the entire tent footprint, providing adequate runoff. However, a normal tarp or even a small tarp can suffice for backpacking trips where weight and space are considerations.
Q: How can I prevent water from pooling on top of my tarp during a rain storm?
A: Ensure that the tarp is pitched at an angle to allow water runoff. Use a ridgeline to create a peak in the tarp, and make sure that the tarp is tight to prevent sagging, which can cause water to pool.
Q: What materials should I look for in a good tarp for tent camping?
A: A good tarp for tent camping should be made of durable, waterproof materials like nylon. It should be lightweight for easy transport in a backpack and sturdy enough to withstand wind and rain.
Q: Can a tarp provide ground cover for my tent?
A: Yes, a tarp can serve as a ground cover or tent footprint, offering protection from sharp objects and moisture at the base of the tent. This helps keep the bottom of the tent dry and undamaged.
Q: How do I prevent my tent from getting wet if the tarp leaks?
A: Ensure that the rainfly is properly installed to provide an additional barrier against water. The tarp should be positioned so that any water that leaks runs off away from the tent, and not towards where the tent gets set up.
Q: What are the benefits of tarp camping compared to using just a tent?
A: Tarp camping offers flexibility in setup, allowing campers to create various shelters according to the environment. It provides an extra layer of protection and insulation, making it ideal for different weather conditions and enhancing overall comfort during camping trips.
Q: How do I fold my tarp for easy storage after use?
A: To fold your tarp, ensure it is clean and dry. Start by folding it in half, matching corners and edges, then continue folding it to a size that fits easily into your backpack. This ensures it remains compact and ready for the next use.


